Tubby Custard is a smooth, creamy dessert inspired by the playful pink treat seen on childhood television.

This homemade version is gently cooked on the stovetop and finished with a soft pink hue and mild vanilla flavor.
I love this recipe because it feels nostalgic, comforting, and incredibly easy to make with basic pantry ingredients.
- Cuisine: British-inspired dessert
- Course: Dessert
- Prep Time: 10 minutes
- Cook Time: 15 minutes
- Chill Time: 1–2 hours
Introduction
Tubby Custard has always felt like one of those magical foods that looked better on TV than anything real could ever be.
For years, I assumed it was just a fantasy. When I finally tried recreating it at home, I realized how simple and comforting it actually is.
It’s basically a classic custard with a fun personality.
This recipe is perfect when I want something sweet without baking, stress, or complicated steps.
It’s gentle, creamy, and makes everyone at the table smile before they even take a bite.
What Is Tubby Custard?
Tubby Custard is a fictional dessert made popular by the children’s television show Teletubbies.
On the show, it appeared as a bright pink, smooth custard served warm and enjoyed enthusiastically by the characters.
In real life, Tubby Custard is best recreated as a vanilla custard thickened with eggs and cornstarch, lightly sweetened, and tinted pink for fun.
It’s not meant to be fancy. It’s meant to be joyful.
Flavor Profile
The flavor of Tubby Custard is mild and comforting. It’s creamy without being heavy, sweet without being overwhelming, and softly flavored with vanilla.
The texture is smooth and silky, making it easy to enjoy with a spoon. The pink color adds visual fun but doesn’t change the taste at all.
My Story With This Comforting Tubby Custard
The first time I made Tubby Custard, it was purely out of curiosity. I didn’t expect much, but once it thickened and turned glossy, I knew it was something special.
Everyone who tasted it smiled immediately, and that alone made it worth keeping.
Now, it’s one of those recipes I return to when I want comfort food that doesn’t take much effort. Some days I serve it chilled, other times slightly warm, and honestly, it works both ways.
Equipment You’ll Need
| Amount | Equipment Name | Notes |
|---|---|---|
| 1 | Medium saucepan | Heavy-bottom preferred |
| 1 | Whisk | Prevents lumps |
| 1 | Mixing bowl | For egg mixture |
| 1 | Measuring cups | Accurate portions |
| 1 | Measuring spoons | For cornstarch and vanilla |
| 1 | Rubber spatula | Scraping sides |
| 4–6 | Serving bowls or cups | Any small bowls |
Ingredients
| Amount | Unit | Ingredient | Notes |
|---|---|---|---|
| 2 | cups | Whole milk | Can substitute low-fat |
| 4 | Egg yolks | Large eggs | |
| 1/2 | cup | Granulated sugar | Adjust to taste |
| 3 | tbsp | Cornstarch | Thickening agent |
| 1 | tsp | Vanilla extract | Pure vanilla recommended |
| 2–3 | drops | Red food coloring | Optional |
| 2 | tbsp | Butter | Adds richness |
Instructions (Step-by-Step)
Step 1
Pour the milk into a medium saucepan and warm it over medium heat until steaming. Do not let it boil.
Step 2
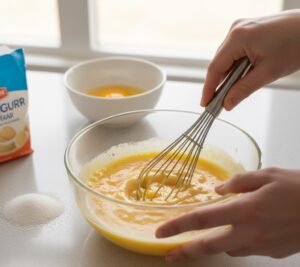
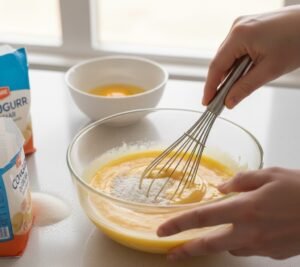
In a mixing bowl, whisk the egg yolks and sugar until pale and smooth.
Step 3
Add the cornstarch to the egg mixture and whisk until fully combined and lump-free.
Step 4
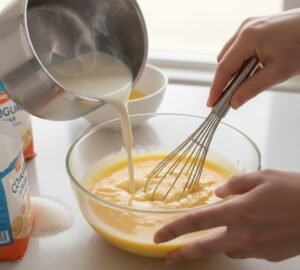
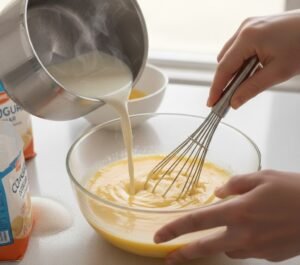
Slowly pour a small amount of the warm milk into the egg mixture while whisking constantly to temper the eggs.
Step 5
Gradually add the remaining milk, whisking the entire time.
Step 6
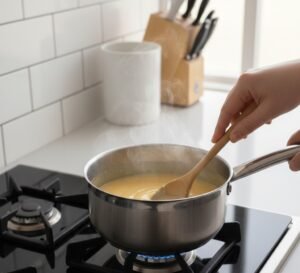
Return the mixture to the saucepan and place it over medium-low heat.
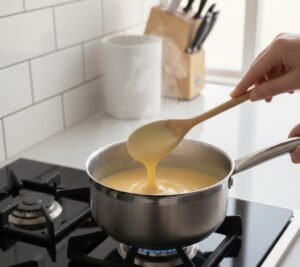
Step 7
Cook while stirring constantly until the custard thickens and coats the back of a spoon.
Step 8
Remove the saucepan from the heat immediately once thickened.
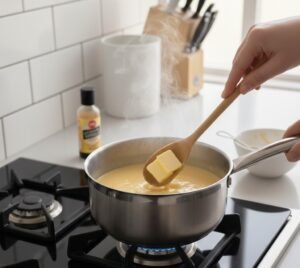
Step 9
Stir in the butter and vanilla extract until smooth.
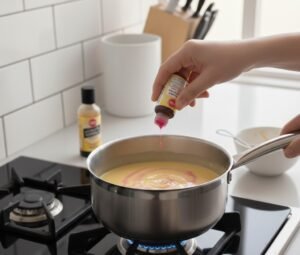
Step 10
Add food coloring one drop at a time until the desired pink color is reached.
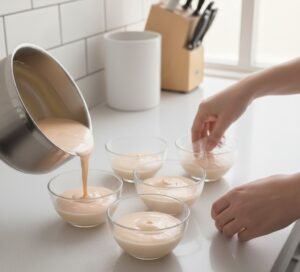
Step 11
Pour the custard into serving bowls and press plastic wrap directly onto the surface.
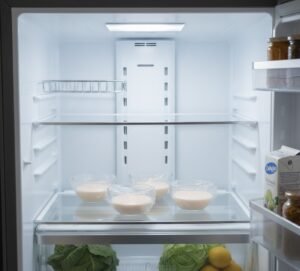
Step 12
Refrigerate for at least 1–2 hours before serving.
Success Tips
Low heat is essential when cooking custard. Rushing the process can cause curdling or lumps.
Stirring constantly helps maintain a smooth texture. I also recommend removing it from the heat as soon as it thickens, since it continues to cook briefly afterward.
Variations to Try
You can add strawberry puree for a natural pink color and light fruit flavor.
Coconut milk works well for a dairy-free version, though the taste will be slightly different.
If you prefer a lighter custard, reducing the sugar slightly still gives great results.
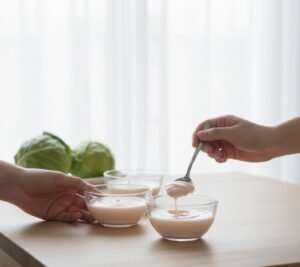
What to Serve With Tubby Custard
Tubby Custard pairs well with simple sides. I like serving it with vanilla cookies, sliced strawberries, or a small dollop of whipped cream.
For kids’ parties, serving it in small cups keeps things neat and easy.
Storage & Make-Ahead Tips
Store leftover custard in an airtight container in the refrigerator for up to three days. Before serving again, stir gently to restore smoothness.
I don’t recommend freezing, as the texture becomes grainy after thawing.
Nutritional Information (Per Serving)
- Calories: approximately 180–200 kcal
- Protein: 6 g
- Carbohydrates: 24 g
- Sugar: 20 g
- Fat: 8 g
- Calcium: moderate amount
- Cholesterol: present due to egg yolks
Values may vary depending on ingredient choices.
Is This Dish Good for You?
Tubby Custard is meant to be enjoyed as a treat. It does provide protein and calcium, but it’s best enjoyed in moderation.
I find that a small serving is satisfying and comforting without feeling heavy.

Tubby Custard Recipe
Ingredients
Equipment
Method
- Pour the milk into a medium saucepan and warm it over medium heat until steaming. Do not let it boil.

- In a mixing bowl, whisk the egg yolks and sugar together until pale and smooth.
- Add the cornstarch to the egg mixture and whisk until completely lump-free.
- Slowly pour a small amount of warm milk into the egg mixture while whisking constantly to temper the eggs.
- Gradually whisk in the remaining milk until fully combined.
- Return the mixture to the saucepan and cook over medium-low heat, stirring constantly.
- Continue cooking until the custard thickens and coats the back of a spoon.
- Remove from heat immediately and stir in the butter and vanilla extract.
- Add food coloring one drop at a time until the desired pink color is reached.
- Pour the custard into serving bowls and press plastic wrap directly onto the surface.
- Refrigerate for at least 1–2 hours until fully set.
- Serve chilled and enjoy.
Notes
- Cook the custard over low heat to avoid curdling.
- Stir constantly once it begins to thicken for a smooth texture.
- Food coloring is optional and can be replaced with strawberry puree.
- Pressing plastic wrap onto the surface prevents a skin from forming.
- Best enjoyed chilled, but can be eaten slightly warm as well.
FAQs:-
What is Tubby Custard made of?
Tubby Custard is made with milk, egg yolks, sugar, cornstarch, and vanilla. Pink food coloring is added for its signature look.
Can I make Tubby Custard without food coloring?
Yes, food coloring is optional. The custard will taste the same without it, just without the pink color.
How long does Tubby Custard last in the fridge?
Tubby Custard can be stored in the refrigerator for up to 3 days in an airtight container.
Can Tubby Custard be served warm or cold?
It can be enjoyed both ways, but it tastes best chilled after sitting in the fridge.
Why did my Tubby Custard turn lumpy?
Lumps usually happen if the heat is too high or the custard isn’t stirred constantly while cooking.
Final Thoughts
This Tubby Custard recipe is simple, nostalgic, and genuinely comforting. I love how easily it comes together and how it brings a bit of childhood joy into the kitchen. Whether you’re making it for kids or for yourself, it’s one of those desserts that always feels like a small win.
Read More:- Crab Fries Recipe