Overview
- Cuisine: American steakhouse-style
- Prep time: About 30 minutes (plus brining time)
- Cook time: About 1 hour
- Servings: 2 large chops
What Makes Perry’s Famous Pork Chop So Special
Perry’s pork chop isn’t just big, it’s dramatic. It’s thick, bone-in, sweet, smoky, buttery, and finished in a way that makes every bite taste intentional.

What really sets it apart is the balance. The pork isn’t drowned in sauce, it isn’t spicy, and it isn’t dry.
Instead, it’s carefully seasoned, slowly cooked, and finished with a caramelized exterior and rich butter.
At home, the goal isn’t perfection or secrecy. It’s recreating that texture, flavor depth, and tenderness using methods we can actually manage.
Hi my name is Dipendra Kumar. I like cooking food for family and relatives. My mom said call me a pro chef.
Picking the Best Pork Chop for This Recipe
This recipe lives or dies by the quality and thickness of the pork chop. Thin chops just won’t work here.
I always choose bone-in pork chops at least 2 inches thick, preferably closer to 3 inches if I can find them. Thicker chops stay juicier and are much harder to overcook.
Marbling matters too. Even if you can’t find premium cuts, look for pork with visible fat running through the meat. That fat melts slowly and keeps everything tender.
Why Brining Is Important
Brining is one step I never skip for thick pork chops. It adds moisture, helps seasoning penetrate deeper, and gives the pork a softer texture after cooking.
I know it sounds like extra work, but once you taste the difference, it’s hard to go back.
A simple brine works best here. Nothing fancy, just salt, sugar, and a few aromatics. Even a shorter brine improves flavor noticeably, but overnight is ideal.
Equipment Needed
I keep the equipment simple and realistic. You don’t need a restaurant setup, just reliable basics.
| Amount | Name | Notes |
|---|---|---|
| 1 | Cast iron skillet | Oven-safe and heavy-bottomed |
| 1 | Meat thermometer | Essential for avoiding overcooked pork |
| 1 | Baking dish | Used if skillet isn’t oven-safe |
| 1 | Mixing bowl | For rub and brine |
| 1 | Tongs | For searing safely |
| 1 | Small saucepan | For finishing sauce or butter |
| 1 | Aluminum foil | For resting the meat |
Ingredients
I like keeping the ingredient list focused. Each item has a purpose, and nothing feels random here.
It is said that if the ingredients are correct and clean, then the food becomes tasty, like the taste was strong in this recipe.
| Amount | Unit | Ingredient | Notes |
|---|---|---|---|
| 2 | large | Bone-in pork chops | 2–3 inches thick |
| 4 | cups | Water | For brine |
| ¼ | cup | Kosher salt | For brine |
| 2 | tbsp | Brown sugar | Brine + flavor |
| 2 | tbsp | Olive oil | For searing |
| 2 | tbsp | Butter | Unsalted |
| 3 | cloves | Garlic | Minced |
| 1 | tsp | Smoked paprika | Adds smoky depth |
| 1 | tsp | Garlic powder | |
| 1 | tsp | Onion powder | |
| ½ | tsp | Black pepper | Freshly ground |
| ½ | tsp | Cayenne pepper | Optional heat |
| 2 | tsp | White sugar | For caramelizing |
| 1 | tsp | Fresh herbs | Thyme or rosemary |
How to Make Perry’s Style Pork Chop at Home
Step 1: Brine the Pork Chops
I start by dissolving the salt and brown sugar in warm water, then letting it cool completely.
Once cooled, I submerge the pork chops fully and refrigerate. For thick chops, I brine them for at least 12 hours. If I’m short on time, even 6 hours helps.
Step 2: Dry and Season
After brining, I rinse the chops lightly and pat them very dry. Moisture on the surface prevents good browning, so this step matters more than people think.
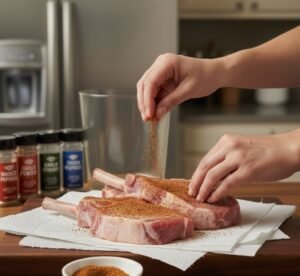
I mix the paprika, garlic powder, onion powder, pepper, and cayenne, then rub it generously over every side of the pork.
I let the chops sit at room temperature for about 30 minutes before cooking.
Step 3: Sear for Flavor
I heat my cast-iron skillet over medium-high heat and add olive oil. Once the oil is shimmering,
I sear the pork chops for about 3 minutes per side. I’m not cooking them through here, just building color and flavor.
Step 4: Slow Roast in the Oven
After searing, I add butter, garlic, and herbs to the pan and transfer everything to a 300°F oven.
The pork roasts slowly until the internal temperature reaches 140°F. I always use a thermometer because guessing leads to dry pork.
Step 5: Caramelize the Exterior
Once the chops are almost done, I sprinkle a light layer of white sugar on the top and briefly place them under the broiler.
This creates that signature caramelized crust. I watch closely because sugar can burn fast.
Step 6: Rest and Finish
I remove the pork from the oven and tent it loosely with foil. It rests for about 10 minutes, and during this time, the temperature rises to the safe finishing point.
Right before serving, I spoon the garlicky butter from the pan over the top.
Secrets to Success
The biggest secret is patience. Rushing the process almost always leads to dry meat. Thick pork needs time.
Using a thermometer is non-negotiable for me, and resting the meat afterward makes a noticeable difference.
Another tip is controlling heat. I’d rather cook slower at a lower temperature than blast the pork and risk losing moisture.
Creative Variations
Sometimes I tweak this recipe depending on my mood. Adding honey during the last few minutes gives a sweeter finish.
Swapping cayenne for chipotle powder adds smokiness. A breadcrumb and herb crust can also work if you want a crunchier bite.
Nutrition Benefits
Here’s a simple nutrition breakdown in list form, based on one large serving.
- High-quality protein for muscle support
- Rich in B vitamins for energy
- Contains iron and zinc
- Moderate fat content for satiety
- Naturally gluten-free
Personal Tips From My Kitchen
I’ve learned that this pork chop tastes even better the next day, sliced cold over salad, and honestly, leftovers are rare.
I also keep extra seasoning mixed ahead of time so weeknight cooking feels easier. And one small thing, don’t skip resting. I used to rush it, and every time I did, I regretted it.

Perry’s Famous Pork Chop Recipe
Ingredients
Equipment
Method
- I dissolve the salt and brown sugar in warm water, let it cool completely, then add the pork chops and garlic. I brine them in the fridge for at least 12 hours for best flavor and moisture.

- I remove the pork chops from the brine, rinse lightly, and pat them very dry. This helps get a better sear later.

- I mix smoked paprika, garlic powder, onion powder, black pepper, and cayenne in a small bowl, then season the pork chops generously on all sides.
- I heat a cast iron skillet over medium-high heat with olive oil. Once hot, I sear the pork chops for about 3 minutes per side until nicely browned.

- I add butter, garlic, and herbs to the skillet, then transfer it to a 300°F oven. I cook until the internal temperature reaches 140°F.

- I sprinkle white sugar lightly over the top of each chop and place them under the broiler just until caramelized. I watch closely so the sugar doesn’t burn.

- I remove the pork chops from the oven, tent them loosely with foil, and let them rest for 10 minutes before serving.

Notes
FAQs:-
Why is Perry’s pork chop so tender?
It’s tender because the chop is very thick, slow-cooked, and often brined. Cooking it gently and resting it properly keeps the meat juicy instead of dry.
What cut of pork is best for a Perry-style pork chop?
A thick, bone-in pork chop that’s at least 2 inches thick works best. The bone helps retain moisture and adds extra flavor.
Do I need to brine pork chops for this recipe?
Brining isn’t required, but it makes a big difference. Even a short brine helps the pork stay moist and well-seasoned inside.
What temperature should pork chops be cooked to?
Pork chops are done at 145°F internal temperature. I usually pull them off the heat a few degrees early and let them rest.
Can I make this pork chop without a cast-iron skillet?
Yes, you can use any oven-safe heavy pan or sear in a regular pan and finish the chop in a baking dish in the oven.
Conclusion
I love this recipe because it makes an ordinary dinner feel special without feeling intimidating.
It’s rich, comforting, and satisfying in that steakhouse way, but still doable at home. I’ve made it for guests, quiet nights, and celebrations, and it never disappoints me. Take your time, trust the process, and enjoy every bite.
Read More:- Pioneer Woman Ramen Noodle Salad Recipe